November 2006
After completing this tutorial, you will have successfully downloaded the Install zip file, created a website, created the database and login for MSSQL 2000, setup the web.config file to work with the database, added an object qualifier (a prefix for all of your table names in the DotNetNuke database), and set up the installation so that you can do multiple installs of DotNetNuke (by making the cookie names unique for each install).
In short, you will have a running DotNetNuke website that is ready to build out.
Introduction
As someone who has worked with DotNetNuke for over two years, I’ve seen and experienced many issues related to installing DotNetNuke. Consider all the variables involved in a real-world DotNetNuke installation:
- ASP.NET 1.1 and 2.0
- Microsoft SQL Server 2000, 2005, MSDE and SQL Express (and this doesn’t even cover the 3rd party Data Providers for Oracle and MySQL)
- OS platforms such as XP, XP with SP2, Windows 2000 and 2003 Server (and soon to be more!)
- IIS 5.x and 6.x
- Installations on virtual directories and websites
- On local machines and remotely via web hosts, the latter with a number of different operating procedures and experience with DotNetNuke installations
- Different types of users—those who just want to install and use DotNetNuke, and those who want to write modules, skin objects and skins. Some want core source. Some want project module sources
- Various IDEs, including Visual Web Developer (VWD), Visual Studio 2003/2005, and perhaps even Sharp Develop’s IDE
- Various levels of security required for different installations
- The mentality of ‘I don’t need to read the documentation’
The above list guarantees that there will continue to be issues with installing DNN. The documentation has improved with each release, but one could write hundreds of pages—focusing solely on the install process—and still there would be ambiguity.
It’s easy to say: “Everyone should read the documentation”—and it needs to be said again. One should never try installing DotNetNuke until after they’ve thoroughly read and digested the Installation pdf. Yet, if one visits the DotNetNuke forums and reads the installation threads, it’s not difficult to see there are a fair share of people that either do not read the documentation (hey, it’s human nature!) and/or read it and see the inevitable gray areas for their particular installation needs.
And there are more than a few excellent tutorials already available for installing DotNetNuke—one has to know or hear of them and then search for them, which of course is another ‘gotcha’—but they’re not always easy to find, and it’s the nature of the beast, that installation tutorials become outdated faster than rabbits reproduce.
The goal of this article is not to try to discuss all of the many permutations—as the above list proves, that’s nigh on impossible. Instead, I’d like to discuss in general the order of the installation steps I would recommend (and why the order is important), and then go through the steps for a specific installation—installing DotNetNuke using the Install zips on SQL 2000 (although the same steps would apply for SQL 2005), on a Windows 2003 Server (with comments for installing on XP SP2. If you have not yet installed SP2 on XP, you should do it before you do an install).
I should add that everything I write here is simply my opinion, based on experience. I’m sure there are many programmers and others who have worked with DotNetNuke longer than I, have memorized the core, and could switch some of these logical steps around and still end up with a successful installation. But that’s the goal—a successful DotNetNuke installation (and still having the same amount of hair on your head at the end of the install as you did when you downloaded the install files).
Which Set of Files You Should Download?
First of all, take a deep breath. It’s really not as hard as it appears to be. I remember the first time I installed DotNetNuke, and it was a harrowing and frustrating experience, but resources like DNN Magazine didn’t exist at the time. A beginner doesn’t know where to find installation tutorials—there was only one place to think of to go, the ASP.NET DotNetNuke forums, and while there were and are multitudes of really helpful people there, one still has to be very clear on what the problem is and be able to put the issues into words, which unless you’re a writer, isn’t easy, since words can be so easily misinterpreted. Then there were the issues with the ‘Search’ feature of the old ASP.NET forums (the new forums search on the DotNetNuke.com site yields much more germane results and is highly recommended).
If you don’t know IIS; if you don’t have an idea of how databases work; if you don’t understand permissions in Windows OSs; and especially if you do not focus on the install—you can get away with not knowing too much about the first two, but the last two are very important. This is the crux, I believe, of many installation problems. Users hear about how great DotNetNuke is, sign up, go to the downloads page, and immediately are confronted with, ‘Um, so which zip file do I download?” The bottom line is:
- If this is the first time you are installing DotNetNuke, I recommend you use the install as described in the documentation. Do it exactly as it is written. Use the default database (SQLExpress), and take care when you are changing/creating the web.config file. Don’t bother with Object Qualifiers and all the other stuff. The goal is to just get DNN running, so you can see all the things it can do for you.
- If you’re missing expertise in one of the above first three subjects (IIS, MSSQL, Permissions), it would be easiest if you just downloaded the Install zips.
- If you feel comfortable with Visual Studio, or with Visual Web Developer, download the Starter Kit files. If you’re planning on doing any programming at all, definitely download this file.
- If you want to create a website, and you want to learn the DotNetNuke internals and build modules, then the following tutorial will work perfectly (I hope!) If you’ve tried to install DNN before, but failed, definitely give this tutorial a chance to work.
The Logical Way to Think of a DNN Installation
One more thing before we dive into the actual tutorial—it’s important to understand the logical steps and the sequence with which to complete the steps of an install. Here’s the order I recommend, and why:
- Make sure your install computer is up-to-date with the latest security fixes, including ASP.NET 2.0, and that if you’re using XP, that you’ve downloaded SP2 and that you have IIS 5.x installed.
- Decide which files to download. For this tutorial, we’re going to use the Install file.
- Download the file to whatever computer you’re planning on doing the install.
- Create a folder under which you want to unzip the DotNetNuke files. Even if you’re not planning on programming, I still recommend you create a ‘website’ folder, just in case you end up hiring consultants (this will be explained). Point is — decide on the home for the files and unzip them there.
- Create the database. You can either use Windows security for the user login/password or SQL Authentication. This tutorial will focus on SQL Authentication. Why do this first? Well, because it’s separate from the rest of the install. By this, I mean, that once you deal with IIS, you have to deal with folder permissions. Once you deal with the web.config file, you’re indirectly messing with IIS. So get the database piece done first.
- Make the changes to the release.config file and rename it to web.config. Why? Because you really don’t want to mess with IIS until you have the web.config file configured correctly. As soon as you create the virtual directory, assign it to ASP.NET 2.0, IIS can potentially make changes to the web.config file. So do all the work you need to do on the .config file first; leave the IIS steps for last.
- Get your permissions set up. Incorrectly assigned permissions, and mistyping things in the web.config steps, are the two most frequent reasons I’ve had install problems. Why do this before the IIS steps? You could switch them, but if you assign the permissions first (including the Internet Guest account), then IIS won’t need to change any of the permission settings—you’ll have done all the work first.
- Complete the steps to create a virtual directory for your website in IIS.
- Open up Internet Explorer, and run the install.
- If you want a website and not just a virtual directory, make the changes required in the DotNetNuke database (PortalAlias table), create the website in IIS (using the same instructions for the virtual directory, except create a website, then stop and restart IIS.
Finally, if you’ve gone all the way to step 10, and you can type an IP address into IE (or you’ve made changes to a client PC hosts file and can type in www.mydomain.com), you should delete the virtual directory.
Gee, It’s About Time! Let’s Install DotNetNuke
Okay, well, installing 4.3.5 was remarkably easy—for those that have installed 2.x and 3.x before, at least. I used the install zips. As stated above, I think it’s important to do it in this order. You really do not want IIS or ASP.NET 2.0 messing with your web.config, until you’ve made the changes you want to make to the web config, and until after you have added the necessary permissions.
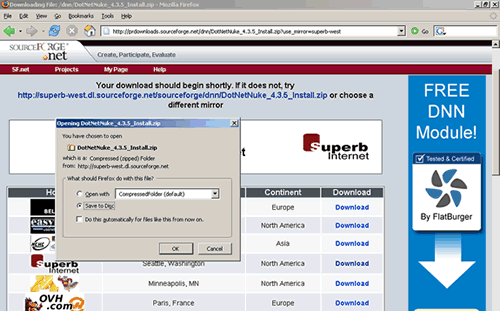
1. Download the 4.3.5 install zips. Navigate to this URL:
http://www.dotnetnuke.com/tabid/125/default.aspx, then click on the ‘DotNetNuke 4.3.5 Install’ link. If you want the complete sources, then click on the ‘DotNetNuke 4.3.5 Source’ link instead. And if you want to be able to build modules and skin objects, etc, then also download the ‘DotNetNuke 4.3.5 Starter Kit’.

2. Again, make sure you have IIS installed. Because ASP.NET 2.0 makes changes to IIS, it won’t make them if IIS is not installed. Once you know IIS is installed (you can verify the IIS install by opening your Control Panel, choose Administrative Tools, and verify that ‘Internet Information Services Manager (IIS) is one of your administrative tools, then make sure you have ASP.NET 2.0 Installed. How can you tell? Well, unless you’ve uninstalled it, you can go to C:\WINDOWS\Microsoft.NET\Framework\ and you should see a folder named ‘v2.0.50727’. You can also open up IIS, open up a current website or virtual folder, click on the ASP.NET tab, and see if ‘ASP.NET v2.0.50727’ is an available option. Then go to Windows Update and make sure you download any updates.

3. Create a folder for your virtual directory/website. You can call it anything you want. However, if you name it different than ‘DotNetNuke_2’, and you want to install and debug the source, you will have to open and edit the dotnetnuke.sln and dotnetnuke.webproj files, and change any urls that point to http://localhost/dotnetnuke to http://localhost/myvirtualfoldername.

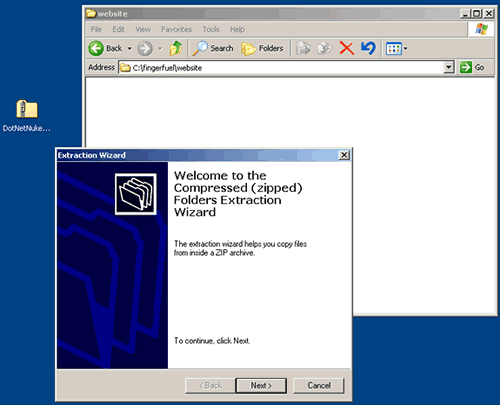
4. Let’s say you call the folder ‘Fingerfuel’. If you downloaded the Install file, open the Fingerfuel folder and create a folder called ‘website’. If you downloaded the Source file, the ‘website’ folder will be created for you once you unzip the files to the ‘Fingerfuel’ folder.

5. Again, if you’ve downloaded the Install zip, then unzip the ‘DotNetNuke_4.3.5_Install.zip’ to the ‘Fingerfuel/website’ folder. If you downloaded the ‘DotNetNuke_4.3.5_Source.zip, then unzip the source zip to the ‘Fingerfuel’ folder.

6. If you want to be able to build your own modules and skin objects, etc, run the DotNetNuke_4.3.5_StarterKit.vsi. More on this in a future article ...
7. Create your database. We are installing for SQL 2000, but the process is essentially similar for SQL 2005.
a. First, open Enterprise Manager, and create a new database. I am calling mine dnn_fingerfuel, but you can call the database anything you want:

And…

b. Once you’ve added the database, create a user with the proper permissions for DotNetNuke. The user needs to have a minimum of db_owner of the database (in this case, ‘dnn_fingerfuel’). Navigate to the ‘Security’ folder (on same level as the ‘Databases’ folder above), click open the ‘Security’ folder, and right-click on the ‘Logins’ node. Select the ‘New Login’ menu item.

I named the database ‘dnn_Fingerfuel’, but again, you can name it anything you want. Make sure you make the default database for this user the DNN Database you created. In my example, the default database I assigned was ‘dnn_Fingerfuel’…

As you can see in the picture above, I have selected SQL Authentication. I have created a username: dnn_ff_dbo and a password: mypassword. We will be adding these details to the web.config file (uid and pwd). You can also select Windows Authentication if you wish.
Make sure that your user for the DNN Database (in my example, ‘dnn_Fingerfuel’) has db_owner privileges:

8. Now let’s make the changes to the .config file. Navigate to the ‘website’ folder. If you’re installing to your own web server or XP, or if you have RDC (Remote Desktop Access) to your server, then rename release.config to web.config. If you are installing to a web host that requires Medium Trust, then rename the development.config file to web.config. Open the web.config file in an editor.
9. Make the following changes to the web.config file:
a. Delete the references to the SQLExpress database:
b. Move the commented out SQLDataProvider ‘-->’ to follow the start of the comment ‘<!—‘ on the line that says ‘<!-- Connection String for SQL Server 2000/2005’. At the end, the configuration settings should look like this:
<connectionStrings>
<!-- Connection String for SQL Server 2000/2005 -->
<add
name="SiteSqlServer"
connectionString="Server=[SERVERNAME];Database=[DATABASENAME];uid=[LOGIN];pwd=[PASSWORD];"
providerName="System.Data.SqlClient" />
</connectionStrings>
Where all of the above words in CAPS and surrounded by square brackets are replaced with whatever you called your database, and whatever username you gave. In our example above, the settings will look like this:
<connectionStrings>
<!-- Connection String for SQL Server 2000/2005 -->
<add
name="SiteSqlServer"
connectionString="Server=system-computername;Database=dnn_fingerfuel;uid=dnn_ff_dbo;pwd=mypassword;"
providerName="System.Data.SqlClient" />
</connectionStrings>
NOTE: if installing to a localhost installation, the connection string may look like:
connectionString="Server=(local);Database=dnn_fingerfuel;uid=dnn_ff_dbo;pwd=mypassword;"
c. Next, you also have to change the connection string in the ‘AppSettings’ section. You should also delete the reference to the SQLExpress connection string completely. Don’t forget to also move the end comment as per above!!! This really gets more than a few people, when they first install DotNetNuke. None of the install tutorials I’ve ever seen mention this—why, I don’t know; perhaps I am the only fool that doesn’t!
When you are done, using our example of our server named, ‘system-computername’, database named: ‘dnn_fingerfuel’, login of ‘dnn_ff_dbo’, and password = ‘mypassword’, the AppSettings section should look like this:
<appSettings>
<!-- Connection String for SQL Server 2000/2005 - kept for backwards compatibility - legacy modules -->
<add key="SiteSqlServer" value="Server=system-computername;Database=dnn_fingerfuel;uid=dnn_ff_dbo;pwd=mypassword;"/>
<add key="InstallTemplate" value="DotNetNuke.install.config" />
<add key="AutoUpgrade" value="true" />
<add key="InstallMemberRole" value="true" />
<add key="ShowMissingKeys" value="false" />
<add key="EnableWebFarmSupport" value="false" />
<add key="EnableCachePersistence" value="false"/>
<add key="HostHeader" value="" /><!-- Host Header to remove from URL so "www.mydomain.com/johndoe/Default.aspx" is treated as "www.mydomain.com/Default.aspx" -->
<add key="RemoveAngleBrackets" value="false" />
<!--optionally strip angle brackets on public login and registration screens-->
</appSettings>
d. Next, if you are going to install multiple DotNetNuke installations on the same server, you should change any of the sections that create cookies…you want to make sure that one installation of DotNetNuke does not confuse storing values in one cookie that is used by more than one installation of DotNetNuke. Here are the two places you need to change cookie names:
<!-- Forms or Windows authentication -->
<authentication mode="Forms">
<forms name=".FFDOTNETNUKE" protection="All" timeout="60" cookieless="UseCookies"/>
</authentication>
And
<anonymousIdentification
enabled="true"
cookieName=".FFASPXANONYMOUS"
cookieTimeout="100000"
cookiePath="/"
cookieRequireSSL="false"
cookieSlidingExpiration="true"
cookieProtection="None" domain=""/>
Notice that I changed the default of .DOTNETNUKE to .FFDOTNETNUKE, and for the anonymous connections cookie, I changed .ASPXANONYMOUS to .FFASPXANONYMOUS…
e. Finally, I strongly recommend that you add an ObjectQualifier to your database. What this does is append to the beginning of each table name in the DotNetNuke database (in this case, ‘dnn_fingerfuel’), a prefix, which will make it harder for your website to be attacked, if hackers do not know the tablenames. You can add anything you want. Here’s what I added:
<data
defaultProvider="SqlDataProvider">
<providers>
<clear/>
<add
name="SqlDataProvider"
type="DotNetNuke.Data.SqlDataProvider, DotNetNuke.SqlDataProvider"
connectionStringName="SiteSqlServer"
upgradeConnectionString=""
providerPath="~\Providers\DataProviders\SqlDataProvider\"
objectQualifier="dnn_fingerfuel"
databaseOwner="dbo"/>
</providers>
</data>
Be forewarned. There are modules out there, which are poorly written, and do not take into account an object qualifier when they install. So there is a chance that if you have an ObjectQualifier, these poorly written modules will not install. Personally, I consider it a ‘module quality filter’. If the module install does not take into account your ObjectQualifier, chances are there are other issues with the module. Either way, you can contact the module developer and let them know of the issue.
10. Now we’re ready to set the proper permissions. I am going to discuss the use of NETWORK_SERVICE, since anyone installing DNN 4.x should be using XP with all Service Packs or Windows Server 2003. This is what usually ends up frustrating people. Windows is very fussy about permissions. It’s also why I changed the web.config file before I set any permissions. There are times when you will move a file to another folder, made changes and save it back to the original folder. Windows is supposed to update the permissions, but it doesn’t do this all the time. Suffice to say, that if you are getting a permissions error, you need to revisit this step…no matter how much you believe that all of the permissions, for all of the files are set correctly. If you get a permissions error, I can assure you that at least one of the files in a folder or sub-folder (or a folder itself), does not have the same settings as the rest of the files and folders.
What I do is go to the folder I created (in this case, C:/fingerfuel), right-click on the folder and select the ‘Securities’ tab (Note: If you do not see the Securities tab, you need to google ‘How to display the Security tab in Windows XP’ and follow the instructions to fix this problem. Microsoft has all kinds of little firecrackers to make this install more difficult). I give full-control to the NETWORK_SERVICE account:
First, right-click on the top folder you created (in my example C:\Fingerfuel), and select ‘Properties’:

Then go to the ‘Security’ tab:

Click on the ‘Add’ button, when the next window pops up, click on the ‘Advanced’ button, and then click on ‘Find Now’ button. You will see all the Permissions available:

Make sure you select the NETWORK SERVICE account. If you are preparing this for an internet site, don’t forget to also select the Internet Guest User! Or people who visit your site will only see a Windows User and Password popup…
11. Now we are finally ready to set up our Virtual Directory:
a. Open IIS (you can find it in ControlPanel->Administrative Tools ->Internet Information Services (IIS). If you do not find IIS, then you must have skipped Step 2! You’ll have to go back and install it and .NET 2.0 again…
Select ‘Administrative Tools’…

Then select IIS (Internet Information Services (IIS) Manager…

Navigate on the left side tree to the ‘Default Web Site’. Right-click on the Default Web Site, and select ‘New->Virtual Directory…’.
b. Create the virtual folder. I called it ‘Fingerfuel’, but you can give it any name you want (however, be reminded that if you install the sources, whatever name you give this Virtual Directory is the name you will have to change in the .sln and .webproj files.
Also in the Wizard, give the Virtual Folder Read and Execute permissions. When you are done with the wizard, find the Virtual Folder you created (in my example ‘Fingerfuel’), right-click on this Virtual Directory, and select ‘Properties’…

c. You will see a dialog window like above. Click on the ‘Home Directory’ tab…

d. Make sure your Virtual Directory is pointed to the website folder inside your folder! This is an important difference between DNN 3.x and 4.x. I always set up DotNetNuke this way (as if I am going to add the source files), since I am going to avail myself of the source code. If you are never going to use the source, well, it doesn’t hurt to have it set up this way anyway…if there are ever any problems with the site, and you hire a programmer to find out what is wrong, s/he will appreciate it if the site is set up this way…
e. Give the Virtual Directory Read and Execute Scripts access.
f. Point the Virtual Directory to your website folder (in my example above, C:\Fingerfuel\website\).
g. Change the Application Pool to ASP.NET 2.0 (If this is not available, as has happened to me when I first installed Windows 2003 Server, use the Default Application Pool, but this usually points to another issue, of which I am still clueless about. Anyone who knows the answer to this, I’d be very interested in knowing it!).

h. Click on the ‘Documents’ tab, and make sure there is a ‘Default.aspx’ file. If not add it. Make sure you move it to the top.

i. Finally, click on the ‘ASP.NET’ tab. Now that your web.config is set up correctly, nothing bad will happen to you. Make sure ASP.NET 2.0 is selected in the drop-down.

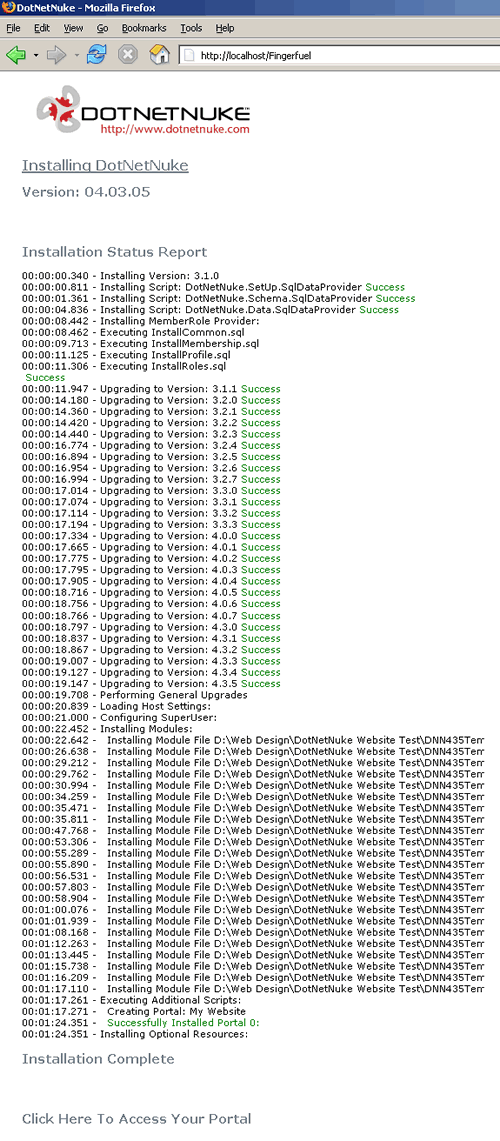
12. Okay. We are finally ready to create our DotNetNuke site. Open IE, or Firefox, type in http://localhost/[VIRTUALDIRECTORYNAME] (in my example above: http://localhost/Fingerfuel). Click the [Enter] key.

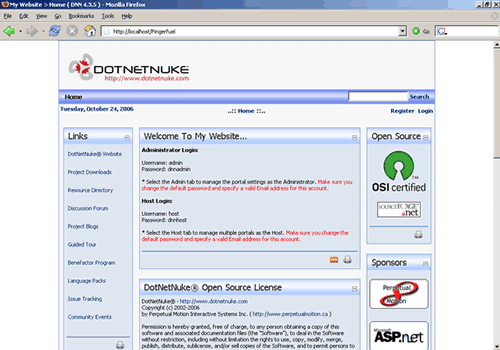
13. Your DotNetNuke site will open, if you have been meticulous and done everything I have specified above, in the same order I have completed them

14. Congratulations. You’ve successfully created a DotNetNuke virtual directory! |