By Lee Sykes
September 2006
(Setting up and customizing the registration page)
In this tutorial we are going to demonstrate how to create a custom registration form for your DotNetNuke portal.
This tutorial continues the
How to build a DotNetNuke website series. If you recall from the
planning of the website we need to create a custom registration page where a user can request a CD-Rom brochure and provide further details about their company.
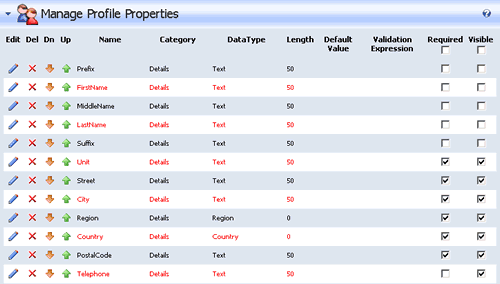
To create a customized registration form we use the Manage Profile Properties page within the User Accounts of a DotNetNuke portal. These settings are only available in the latest 4.3 and 3.3 versions of DotNetNuke.

Manage Profile Properties page

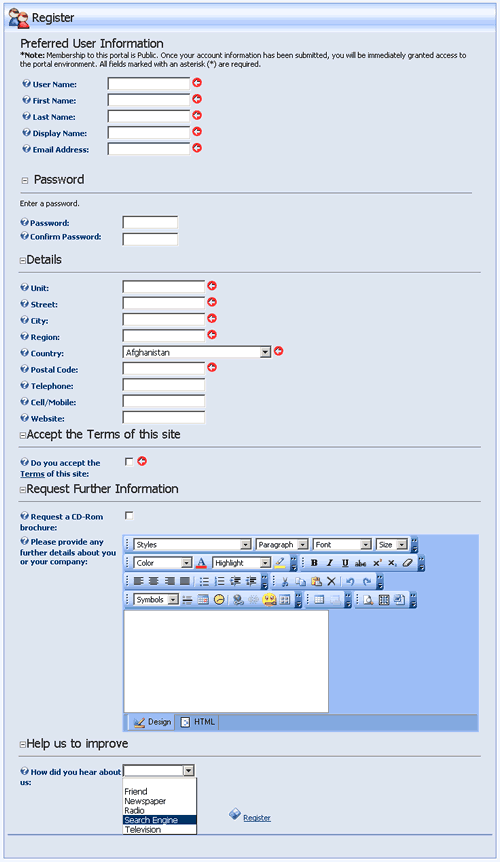
The custom registration page we create in the tutorial
In these 6 videos (53 mins) we demonstrate how you can customize the registration page and profile pages for a user. This will cover selecting which form fields are visible, which are required to be filled in when registering, through to creating your own custom registration form where you can request any information you require from the users when they register with your website.
Introduction Video
The videos cover:
Video 1 - Introduction and basic concepts
- Introduction
- Introduction to the Manage Profile Properties page
- Covering the default settings in DotNetNuke
- Example of registering as a new user with the default settings
- Editing the registered user profile
- Setting form fields in the registration page to required
- Setting form fields to hidden so they are not displayed on the registration page
Time Length: 4min 57secs
Video 2 - First configuration options and removing duplications
- Demonstration of Registering with the required details from the Manage Profile Properties
- Setting the User Registration to verified combined with Required details from the Manage Profile Properties
- Setting the registration page to display as one page with all details from the Manage Profile Properties
- Duplication of required name details, demonstration
- How to remove the duplicate name details in the registration form when the registration form is displayed as a single page
- Demonstration that the name category title is still displayed
- How to remove the name category
Time Length: 11min 31secs
Video 3 - How to create a custom registration page
- How to customize the registration page
- Continuing the ‘How to Build a Website in DotNetNuke’ series (URL)
- Demonstration of the registration page we are going to create with:
- A check box to request a CD-Rom brochure
- A Rich Text editor to allow the user to request further information and specify details about their company
- A drop down list for market research of where the user heard about the website
- A check box which states that the user agrees to the Terms and Conditions of the website
- How to create a custom registration page
- Setting the registration page to display as a single page
- Configuring the default registration form
- Removing the duplicate name details
- Setting address details to required
- Removing visibility of the registration for elements that are not required
- Viewing the registration page - name, address, contact info and preferences need to be grouped together under one category
- How to change the category for all of the registration form elements in the Manage Profile Properties page
- Viewing the changes with all form elements grouped together
Time Length: 8min 11secs
Video 4 - Adding first custom form fields
- Adding custom form fields to the registration page
- How to add an ‘Accept The Terms of this website’ tick box
- Explanation of Add New Profile Property page
- Covering: Property Name, Explanation of the various Data Types, Property Category, Length, Default Value, Validation Expression, Required, Visible, View Order
- Viewing the ‘Accept Terms’ check box in the registration page
- Formatting the text for the ‘Accept Terms’ check box
- Editing the profile.ascx file
- Setting the text to display for the: form field text, help text, required text, validation text
Time Length: 11min 11secs
Video 5 - Adding further custom form fields
- Viewing the formatted text for the ‘Accept Terms’ check box
- Accessing the Language Editor to create a link to the Terms of Use Page
- Creating a new category of ‘Request Further Information’
- Adding a check box to request a CD-Rom brochure
- Adding a rich text box to request further information
- Editing the profile.ascx file
- Setting the text to display the form field text and help text for the check box and rich text box form fields
Time Length: 9min 49secs
Video 6 - Creating custom drop down lists in the registration form and conclusion
- Viewing the Request Further Information section
- Adding a market research drop down list to the registration form
- How to populate the drop down list property in the Registration form
- How to create the list items
- Editing the profile.ascx file
- Setting the text to display the form field text and help text for the market research drop down list form field
- Viewing the new market research drop down list
- Testing the registration page, registering as a new user
- Viewing and checking the stored details
Time Length: 7min 41secs
Total Time Length: 53min 20secs