By Lee Sykes
January & February 2006
In this tutorial we are going to explain how to upload and install a skin to your DotNetNuke® portal. Before we can do this we need to explain where the skins are stored, and how a skin can be applied to a portal.
If you don’t know what a skin and container is, follow this tutorial to learn the
basic principles of DotNetNuke and Skins.
DotNetNuke allows you to create an unlimited number of portals within your main DotNetNuke website.
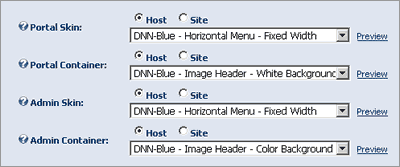
You can install different skins for each portal that you have created and as the administrator to a portal you can choose whether to use a skin from the Host portal or your current Site portal.

In Admin / Site Settings using the radio buttons ‘Host’ or ‘Site’ you can select the location of the skins to use
If you install a skin to the Host portal section, all of the portals created under this installation of DotNetNuke will be able to access and use the skin.
If you install a skin to the Site portal section, only the current portal that you are using will have access to the portal.
(If this is confusing, it will become clearer in the video tutorial)
To install a skin to the Host portal section:
- Log in as Host
- Go to the Host menu / Skins
- Follow the steps outlined in the video below
The Skins will be installed to the following location:
\Portals\_default\Skins
The Containers will be installed to this location:
\Portals\_default\Containers
To install a skin to the Current Site Portal:
- Log in as Host or Admin for your portal
- Go to the Admin menu / Skins
- Follow the steps outlined in the video
The Skins will be installed to the following location: (If you only have one portal installed)
\Portals\0\Skins
(If you have several portals installed, you need to use the portal ID number)
\Portals\PortalID\Skins
The Containers will be installed to this location:
\Portals\0\Containers
or
\Portals\PortalID\Containers
Setting permissions for uploading skins
The default installation of DotNetNuke does not give administrators skin upload privileges, it only gives the Host account access to upload skins.
To enable the administrator account access to upload skins:
- Login as Host
- Go to the Host menu / Host Settings
- Scroll Down
- Click on Advanced Settings
- Click Other Settings
- Here you will see “Skin Upload Permission”

- To enable administrators access to upload skins, select Portal
- To only allow the host account access to upload skins, select Host
- Click on Update
Video 1 - Install a skin
We are now ready to install a skin, follow the video below for a demonstration of how to install a skin covering all of the points mentioned above.
Time Length: 13min 26secs
Video 2 - Automatically batch install skins and containers
It is possible to upload several skins and containers to your DotNetNuke installation using FTP software and to batch install all of the skins at once.
The video tutorial below demonstrates how to automatically install skins and containers to DotNetNuke.
Time Length: 4min 55secs
Where Next?
Once you have learnt how to install a skin, you will need to apply the skin to your portal or a page within your portal, this tutorial will demonstrate
how to apply and use skins and containers in DotNetNuke.