By Evan Camilleri
December 2009
DotNetMushroom Rapid Application Developer (RAD) is a new application builder for DotNetNuke. It was launched at OpenForce Europe this year. The scope of RAD is to allow a user or developer to build an application which is made up of tables, queries, and forms.
You can install a trial version of DotNetMushroom RAD from the
DotNetMushroom website.
In this article we will start by creating a table for news items, create a form to insert or edit news records, and display the results in another form.
Introduction
After you install DotNetMushroom RAD, insert a DotNetMushroom RAD module into your page. This will show you the RAD Application List.
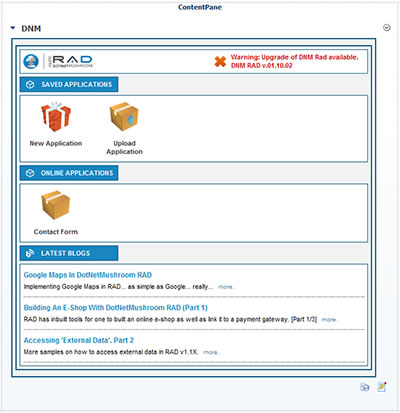
The DotNetMushroom RAD Application List.
The main scope of the RAD Application List is to show you a list of saved applications which you have in your system. Since this is a new installation you only have the option to create a new application or upload an existing application.
The RAD Application List shows you also a list of existing applications which you can download, as well as the latest DotNetMushroom blogs. Besides this, the RAD Application List also shows you if this is the latest version of RAD. In the above case, it is not.
Creating the Application
Click on ‘New Application’ icon. Enter the application name, let’s enter ‘News’ and then click Save. Now in the Application List you have a new icon for the News application. Click it so that you will go to the Control Panel where you can start creating your application. Here is where you will create your application.
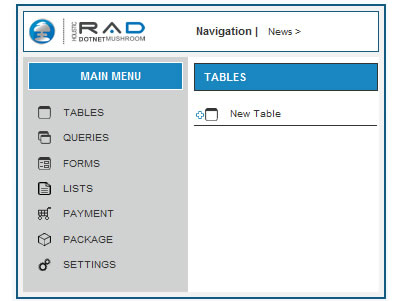
The Control Panel: where you can create your application.
Creating the Table
Click on ‘New Table’ on the right hand side of the Control Panel. This will allow you to create a new table. Name this new table as ‘News’, and then click ‘Save’. Now we are ready to enter the fields of our table.
For this example we will try to keep things simple, so all we will be creating is just two fields:
- Date of News entry
- Actual News entry
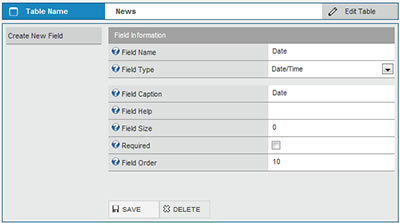
Adding new fields in the Table creator
Here you can set the properties for each field. The left hand side (gray area) is the property name, while the right hand side is the property value. For the ‘Date’ field we will create a field with Field Name ‘Date’, the ‘Field Type’ should be ‘Date/Time’, the Field Caption we can do it as ‘Date’, and we tick the required field.
Click ‘Save’.
Now for the ‘News’ field we will create a field with Field Name ‘NewsText’, the ‘Field Type’ should be ‘Memo’, the Field Caption ‘News Text’, and we tick the required field.
Click ‘Save’.
Creating the Edit Form
Now let us create the form which will allow us to insert or edit data into the News table.
First click on ‘Control Panel’ in the Navigation section breadcrumbs. This will redirect you back to the Control Panel.
The Form
Now click ‘Forms’ on the left hand side.
Click on ‘New Form’ on the right hand side. Name the new form ‘NewsEdit’ and then click ‘Save’. You will be redirected to the Form Editor.
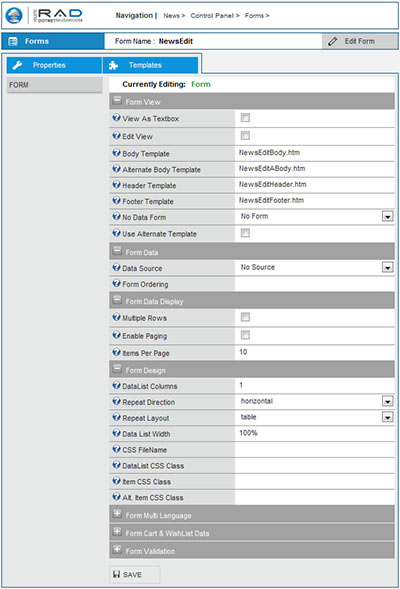
Form Builder: New form inserted in the News application.
Here you can set the properties for the form. In the same screen you will also set the properties for each control which we will subsequently add.
Edit the property ‘Data Source’ and set it to ‘Table: News’ by selecting it from the drop down list.
Click ‘Save’ to save the form.
Now go into the templates section by clicking on the Templates (blue) tab.
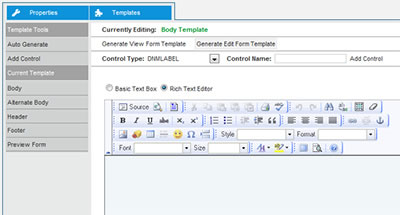
Template Editing
Click ‘Generate Edit Form Template’ and this will automatically generate the edit form template rather than having to create everything from scratch.
This will create a table with two columns in the HTML section with the fields that you have in your current data source.
For simplicity clear the contents of the first column in the HTML section (the columns start with a DNMLABEL tag). Then in the first columns of the first row type ‘Date’ and in the first columns of the second row type ‘News’.
Click just below your table on your HTML section. We will add a button which will allow us to save the data in the Edit form. Select a control from the Control Type dropdown to ‘DNMBUTTON’. Set the control name to ‘btnSave’. Click ‘Add Control’.
Your template should look like the following image:
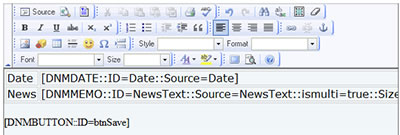
Edit Template done!
Now click ‘Save Template’ at the bottom of the screen.
If you now click on the (blue) ‘properties tab’ you will see the controls, on the left part of the section, which have been added to the form.
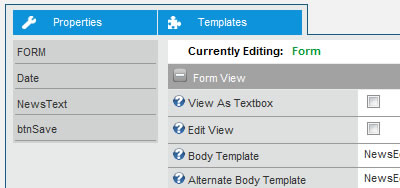
Going back to the properties tab
The Save Button
Click on the ‘btnSave’ control. You will see the button’s properties.
In the ‘Button Text’ property type ‘Save’.
In the ‘Button Event’ property select ‘Save & Back to Caller’.
We are ready from the Edit Form. Now let’s create the view form.
Creating the View Form
Now let’s create the form with which the users will see your news items.
The Form
Click on ‘Forms’ in the Navigation section breadcrumbs.
Click on ‘New Form’ on the right hand side. Name the new form ‘NewsView’ and then click ‘Save’. You will be redirected to the Form Editor.
Edit the property ‘Data Source’ and set it to ‘Table: News’ by selecting it from the drop down list.
Click ‘Save’ to save the form.
Now go into the templates section by clicking on the Templates (blue) tab.
Click ‘Generate View Form Template’ and this will automatically generate the edit form template rather than having to create everything from scratch.
This will create a table with two columns in the HTML section with the fields that you have in your current data source.
Click just below your table on your HTML section. We will add a button which will allow us to edit existing news item by navigating us to the Edit form. Select a control from the Control Type dropdown to ‘DNMBUTTON’. Set the control name to ‘btnEdit’. Click ‘Add Control’.
Your template should look like the following image:
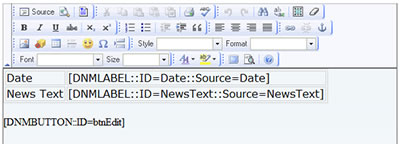
View Body Template
Now click ‘Save Template’ at the bottom of the screen.
On your right hand side click ‘Footer’.
We will now add a button which will allow us to add a new news item by navigating us to the Edit form. Select a control from the Control Type dropdown to ‘DNMBUTTON’. Set the control name to ‘btnAddNew’. Click ‘Add Control’.
Your template should look like the following image:
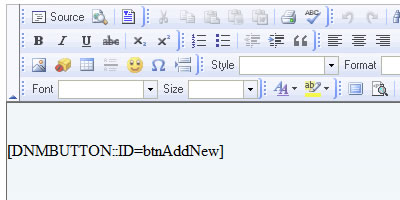
Add new Footer template
Now click ‘Save Template’ at the bottom of the screen.
If you now click on the (blue) ‘properties tab’ you will see the controls, on the left part of the section, which have been added to the form.
Click on the ‘FORM’ control. You will see the form’s properties.
Tick the ‘Multiple Rows’ property since we want this form to show more than one record.
Click ‘Save’
DotNetNuke Settings Section
In this moment let’s go back to the page in which our DotNetMushroom RAD module was inserted and this time we select settings. Go to the bottom on the settings page and find the ‘DNM Settings’ section.
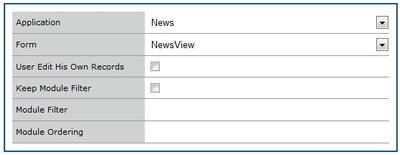
DotNetMushroom RAD module settings in the DotNetNuke settings section
Select the ‘Application’ setting as ‘News’, and the ‘Form’ settings as ‘News View’.
Click ‘Update’.
Now going back to the page you will see that the DotNetMushroom RAD Application List has disappeared and instead our ‘NewsView’ form is present. Obviously it is empty since there is no data.
From the DotNetNuke menu select ‘Control Panel’ and you are back in the RAD Control Panel.
Select ‘Forms’.
Click on ‘NewsView’.
The Edit Button
Click on the ‘btnEdit’ control. You will see the button’s properties.
In the ‘Button Text’ property type ‘Edit’. In the ‘Button Event’ select ‘Navigate’.
Click ‘Save’
Now in the ‘Navigator Filter’ property of the same ‘btnEdit’ control click on ‘Click here to Add Navigator’. The navigator popup form is displayed. Here we are going to instruct RAD that when this button is clicked then the user should be redirected to our NewsEdit page and load the current record for editing.
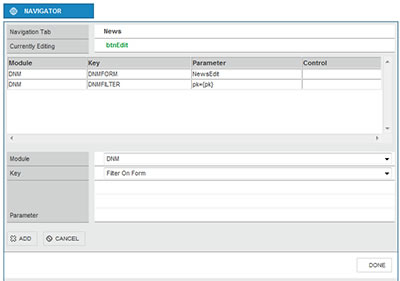
Perhaps one of the most powerful features of RAD: The Navigator
At the bottom of the form add the following two items:
First select in the ‘Key’ item ‘Change Form’, then in the ‘Forms’ item select the ‘News Edit’ form. Click ‘Add’. This navigator command is instructing the navigator that it should select the same Navigation tab (or DotNetNuke page) which is named ‘News’, and in module ‘DNM’ (which is the default module name when inserting a DotNetNuke RAD module – it is always a good idea to give a more meaningful name) it changes the form to ‘NewsEdit’.
Then select in the ‘Key’ item ‘Filter on Form’ and put ‘pk={pk}’ in the parameters section. Click ‘Add’. This navigator command is instructing the navigator to filter the current form (which has been changed to ‘NewsEdit’). The filter ‘pk={pk}’ means to filter the form using the pk field (primary key which is automatically created for every table in DotNetMushroom) with the {pk} field of the current form. (Including the field in a {curly-brackets} means to get the data from the current form).
Click ‘Done’.
The Add New Button
Click on the ‘btnAddNew’ control. You will see the button’s properties.
In the ‘Button Text’ property type ‘Add New’. In the ‘Button Event’ select ‘Navigate’.
Click ‘Save’
Now in the ‘Navigator Filter’ property of the same ‘btnAddNew’ control click on ‘Click here to Add Navigator’. The navigator popup form is displayed.
At the bottom of the form add the following item:
First select in the ‘Key’ item ‘Change Form (Add New)’, then in the ‘Forms’ item select the ‘News Edit’ form. Click ‘Add’.
Click ‘Done’.
The News Application
And our application is ready.
Using the Application.
Now go the page where the application is associated and click ‘Add New’. Select a date and add some text and Save. And viola! Here is our application in action.
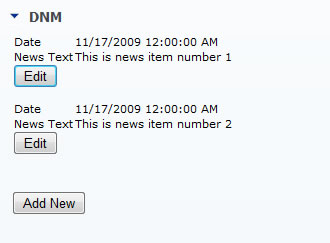
Finally the application: now let’s give it to a designer :)
Obviously through the templates you can edit the HTML directly in order to format the page in the correct style and according to the visual required by the website.
As you can see there are lots of possibilities. The selection of properties and controls available also means that you can go into much more advanced features and create more complex applications. The Navigator itself is a powerful tool which literally joins the forms and allows you to make whole applications.
Comments