By Lee Sykes
January 2007
The portal system in DotNetNuke is one of its most powerful features. In this article we will outline how the DotNetNuke portal system works and how it can save you money on your hosting bills.
Standard Hosting Method
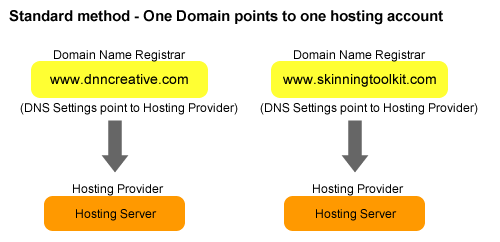
The standard method for hosting is that you purchase a domain name and purchase a package with a hosting provider.
As you can see in figure 1, if you wish to purchase a second domain name, you usually have to purchase a second hosting package. Purchasing the hosting space for multiple domains can soon become a costly business.

Figure 1.
DotNetNuke Multiple Portal Method
DotNetNuke allows you to use a single hosting account for multiple domain names. Within DotNetNuke, you simply create a portal for each of the domain names. You no longer have to pay several hosting bills for hosting your websites, DotNetNuke can display the content for each of your domain names from one installation, ie. one hosting account (see figure 2).
How it works (basic steps)
1) Point Domain names to Hosting Providers’ server
Purchase your domain names from a domain name registrar and point the domain names to your hosting providers’ server (using the DNS settings). Read this tutorial for further information:
How to adjust your Nameserver settings.
2) Point Domain Names to your single DotNetNuke Installation
In your Hosting Providers control panel, go into the IIS settings and adjust the Host Header settings to point the domain name to the IP address of your DotNetNuke installation.
We explain how to do this in this video tutorial. 3) Create portals in DotNetNuke
In DotNetNuke create multiple portals for each of your domain names. The Portal Alias settings pick up the domain name and point it to the correct portal.
We explain how to do this in this video tutorial. 
Figure 2.
From one DotNetNuke installation you now can create the content for several domain names.
DotNetNuke Portals, Parent and Child
In the DotNetNuke community, the confusion generally arises when trying to understand the differences between a parent or child portal.
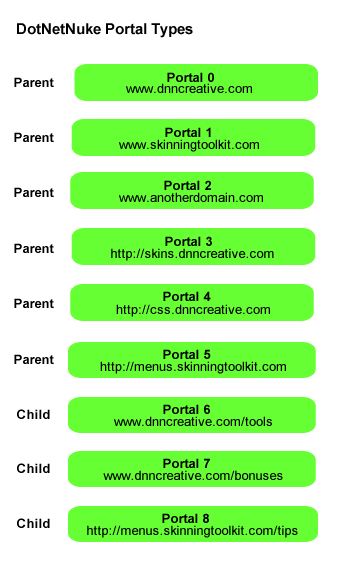
The difference is the URL.

Figure 3.
Parent Portal
A parent portal has its own unique domain name, for instance:
www.dnncreative.com
www.skinningtoolkit.com
http://skins.dnncreative.com
http://menus.skinningtoolkit.com
(Note that this includes sub-domains)
Child Portal
A child portal is a URL that is a subset of a unique URL, for instance:
www.dnncreative.com/tools
www.dnncreative.com/bonuses
http://menus.skinningtoolkit.com/tips
(Note that a subdomain can have a child portal URL)
If you are using a “/” after the domain name, ie.
www.dnncreative.com/ then this is a child portal.
View Figure 3 for examples.
All Portals are created equal
All portals, whether Parent or Child are equal, they do not have any special administration advantages. When you create a portal, DotNetNuke by default gives the portal a number. The portal numbers start from 0. There is no difference in priority between portal 100 and portal 0.
The difference
The only difference between a parent and child portal is that a child portal creates a folder in the root of your DotNetNuke installation. John Mitchell (core team member) further explains in a forum post that, “Inside this folder is a default.aspx file which redirects the portal to the main install directory….
…Therefore a parent portal may have a slight performance advantage over a child portal because a parent portal will not have the hit of the initial re-direct back to the main install.”
When first visiting a child portal you will notice that the URL is re-loaded and is in the form of:
Enter:
www.dnncreative.com/tools
Becomes:
www.dnncreative.com.com/default.aspx?alias=tools When you click on the various pages within the child portal the URL displays in the standard format. It is just the initial loading of the Home page where the URL is re-written to include:
?alias=childportalname If you want to remove the
?alias=childportalname John Mitchell has posted some methods in his blog:
Use SiteUrls.config to clean up the DotNetNuke Child Portal Url Portal Numbers
When you create a portal, DotNetNuke assigns a portal ID to the portal. By default, DotNetNuke numbers the portals starting from 0, as you can see in figure 3. Your default installation of DotNetNuke uses the portal number 0. When you create a portal, you do have the option to override the default portal ID and you can enter your own name for the Portal ID.
Administration of Portals
Only a host super user has full administration access to all of the parent and child portals.
A user registered to a portal that has administrator access, only has access to edit the content of the portal that they are registered to.
There is no difference in managing the administration of parent or child portals.
Host control: Premium modules, skins, disk space
The host super user can select which modules and skins are available to each of the portals. The host user is the only person who can upload and install modules. The host user also has the option to deny or allow the administrator of a portal to upload skins to their portal.
Further configuration options are also available to the host user, such as specifying how much disk space each portal is allowed to use and the configuration of the site logs for each portal. Read
Managing and Configuring Portals as a Host Super User for further information.
Now that you understand the basic concepts of how DotNetNuke portals work, follow this video tutorial which covers all of these concepts and demonstrates
how to create and configure the different types of DotNetNuke portals.